
Achieving Bullet Time with Android
Discover how we achieved a bullet-time effect on Android devices, using 12 synchronized phones arranged in a 120° setup. This project explored different scenarios, overcame challenges, and showcased how to create stunning 180-degree capture, similar to what you see in high-end sports broadcasts

by Tze Yong Chu,
Recently in the 2024 Olympic badminton events, I noticed they are using 180-degree bullet time capture with DSLR or mirrorless cameras. This reminded me of a project we previously worked on, where we used Android devices to create a bullet time effect.
It was a fun project that involved exploring various scenarios and overcoming challenges. Some ideas didn’t make it into the final implementation due to time constraints.
Below is a clip of bullet time capture in Olympic 2024 badminton.
Let’s Begin
The main concept we implemented involved using one central device as a server to control 12 other devices simultaneously. We used all same devices arranged at approximately 120° angles.
Our first decision was to use the Android Camera1 API in our code. Although Camera2 was available at the time, we chose Camera1 because we needed a method that would consistently return image frames for every single frame in raw data type. With raw data, we could convert it into any format. This method was faster and eliminated the need to convert data into raw type before converting it to other formats, thus reducing image capture delay.
private PictureCallback mPicture = new PictureCallback() {
    @Override
    public void onPictureTaken(byte[] data, Camera camera) {
      // byte[] data is a raw data, we can direct convert this into other format we need.
      //
    }
};
After capturing images on each individual device, we sent the images to the central device. The central device processing merge these images into a single video using FFmpeg.
Method : Web Socket
After setting up the camera API, our first approach was to use WebSocket for communication. WebSocket is a protocol designed for web applications requiring continuous, low-latency connections between client and server. It allows both the client and server to send and receive messages simultaneously, reducing the overhead of re-establishing connections and achieving real-time communication with minimal delay.
We initially used Android’s native WebSocket implementation from java.net. While sufficient for basic send and listen operations, it had issues with maintaining long-term connections. We had to implement a job to consistently ping the central device to keep the connection alive.
We also discovered that the native WebSocket wasn’t suitable for transferring image data due to data loss while transferring and lack of built-in error checking or retry mechanisms. This lead to corrupted images after central device received. To address this, we switched to the AndroidAsync library (https://github.com/koush/AndroidAsync), which allowed the central device to act as a server while other devices used its API to upload images. This library helped us manage error handling, retries, and connection issues more effectively.
With this setup, we tested an effect similar to the Olympic 2024 badminton bullet time. While capturing stationary subjects went fine, but when it came to dynamic actions like jumping, we ran into major timing issues. The delay between consecutive images could be as long as 500 milliseconds, with our best result being around 200 milliseconds. This delay really impacted how smooth the bullet time effect looked.
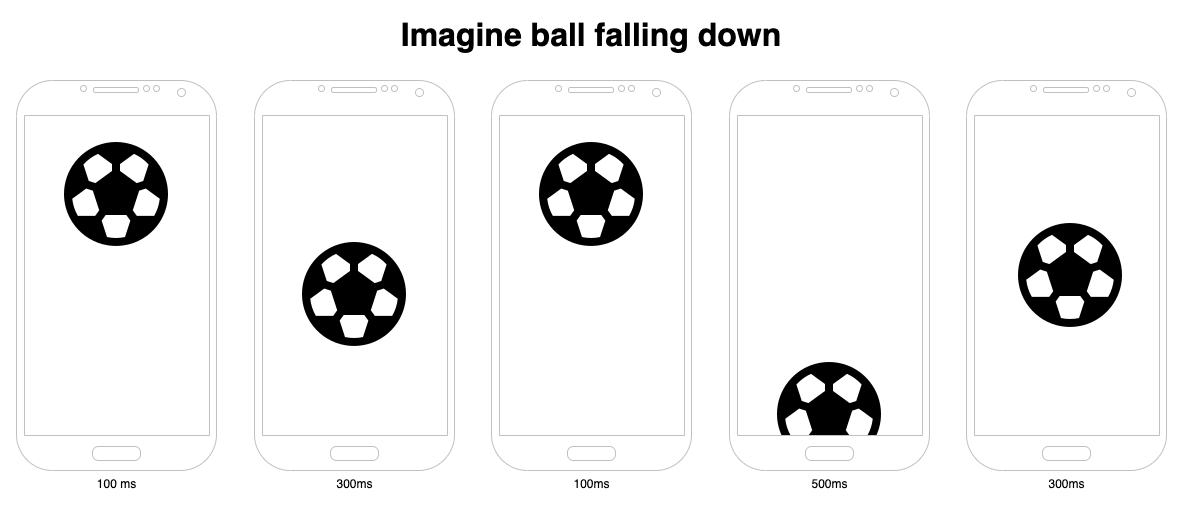
The ball drop shows the problem with synchronization. When the devices aren’t perfectly synced, each image shows the ball at a different height. It might look fine on its own, but when you put all the images together in a video, you end up with a flickering effect.
The delay mainly comes from using local WiFi and WebSocket communication. While WebSocket is usually quick, it doesn’t completely get rid of network-related delays. Since everything goes through the network, some delay is just part of the deal.
Method : 5 Second Countdown
We implemented a 5-second countdown timer to improve synchronization. During this countdown, the central device continuously broadcasts the remaining time to all client devices. This helps account for the delay in communication from the central device through the network to each client device.
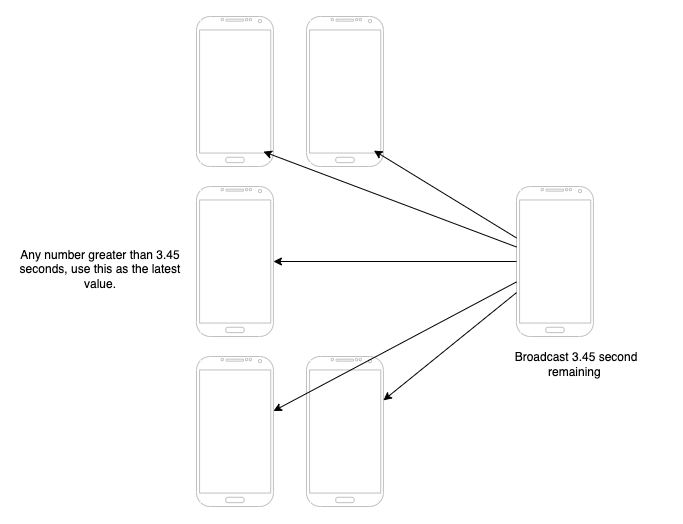
The key idea is that the central device keeps sending updated remaining time information. If the new remaining time is less than what was previously communicated, the client devices use this as their new reference point. This approach helps to adjust for varying network delays.
This method does succeed in reducing the timing below 200 milliseconds. However, despite this improvement, the results were still not what we need.
Method : Sound Frequency
The next method we thought of was using sound frequency as a trigger. Mobile devices can generate a 20kHz frequency, which is at the upper limit of what humans can hear. It’s a really sharp pitch — if your hearing is good, you might catch it, but if your hearing isn’t great, you probably won’t notice it at all.
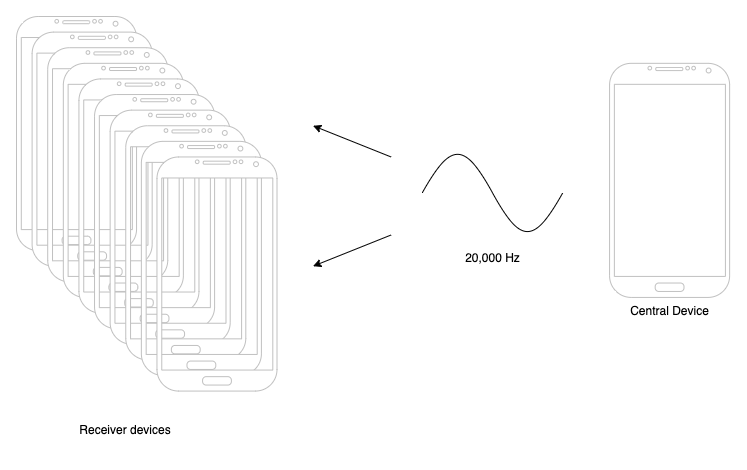
The central device generates a 20kHz sound, and the remaining devices listen for that generated sound. This method works, but it’s not ideal. If the central device is too far away from some of the client devices, the sound might not reach them.
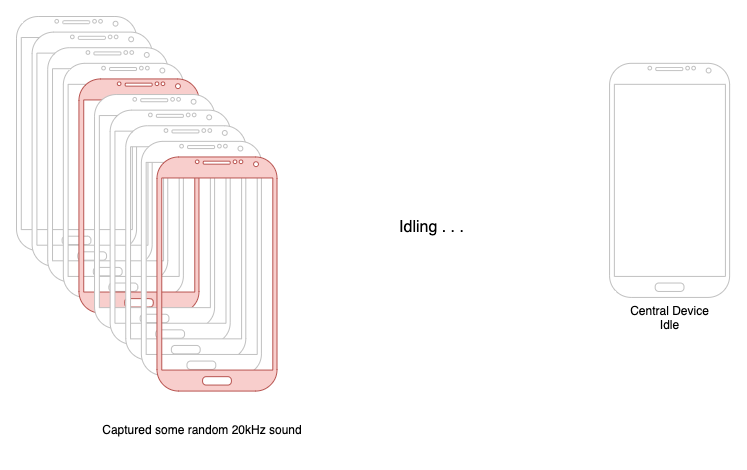
And because the listener devices must always be listening for the frequency, they sometimes false alarm and trigger a capture when they’re not supposed to. This unintended triggering is another problem with the sound-based approach.
Method : Audio Jack 3.5mm
The next method we thought of was using the legendary 3.5mm audio port. The idea was to connect all the devices using audio cables and trigger them through this connection.

We are using this 3.5mm audio adapter to connect to various devices. The 3.5mm cable must be a specific type: it must use a TRRS 3.5mm jack, else it will not compatible what we need.

The reason why the 4-pin head or TRRS is important is that we need pin 4 (Sleeve/Microphone) to utilize the function methods. By using low voltage to trigger messages to other devices, it depends on specific ohm values to understand which function is being activated. Below is an image showing the range of ohm values for each function.

Pin 4 is essential for controlling the functions we need, which is why we require a TRRS jack to trigger these functions.
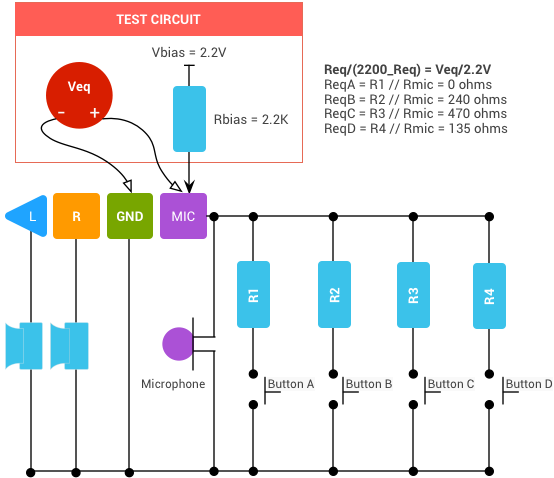
To use the functions mentioned above, we need a resistor to control the current. However, there’s a problem: when we connect to only one device, it triggers without issues, but when we connect 2 to 3 devices, it doesn’t always work reliably. My thought is that the voltage transfer is split, causing some of the voltage not to reach the devices.
How Olympic do ?
Their setup might be look like this in a very simply way, all the cameras use USB cables to connect to a single USB hub, which is then directly connected to the PC.

USB generally provides a more stable connection compared to using web sockets, 3.5mm head jacks, and sound frequency. Additionally, using a PC to generate the video is much more powerful than relying solely on Android devices.
We had considered this setup before, where each device is connected to a USB hub to trigger actions. However, we did not proceed because it required too much research, and we had limited time. At that time, we had no idea how to establish communication through the USB cable, allowing a central device to communicate with all devices via USB. However, I believe that if we had more time, we could have made it work.
Summary
At that time, we were inspired by the bullet time effect in The Matrix and wanted to recreate it using Android devices. The research and testing took time but were a lot of fun and provided a deeper understanding of how each method works. Brainstorming played a crucial role in our growth and making things happen.
Nowadays, there are already people selling this software, and there are more and more software options, tutorials, and resources available for people to use. It’s been a wild ride, and we’ve learned a lot along the way. We’re looking forward to seeing what’s next and continuing to explore new tech and ideas.